
So, the pretty gf of mine jio me for baking class previously but was "rejected" by me due to the course fees & location (travel to buona vista after work = FAR :C ). But nvm...I manage to come across a Groupon deal for a 2-hr Hands On Chocolate and Cranberry English Scone Baking Class :DDD
Only $93 for 2pax & the best thing is it is just a block away from my house. *DOUBLE YAYAYAY!!* Jess is cool enough to agree immediately :)
PS: The normal price for baking classes held at Baking Studio is usually in the range of $100 or more. Thus, our deal is consider pretty good.
OUR FIRST BAKING CLASS TOGETHER!! (:


INGREDIENTS NEEDED :)
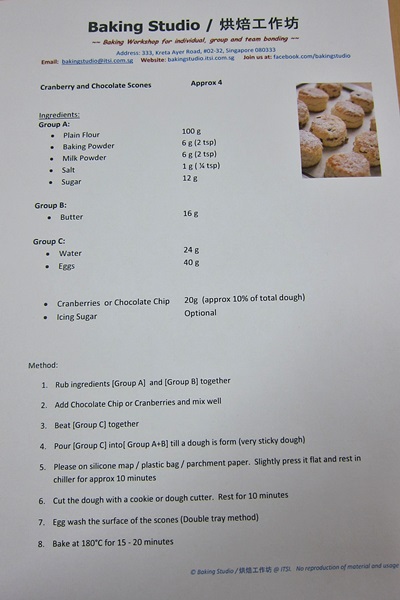
Make 4-5 scones
*refer to below for certain things to note*

Our teacher demonstrating. She is good & patient.
Willing to teach :) But erms, I forget her name :O

Cranberries can be replaced with chocolate chips, raisins, blueberry etc etc..
to your own preference :) But rmb, not to put over put the ingredients,
cos the main is the "bread" (scones), not the dry ingredients.

preparing our Group C ingredients
*very random, but our skin colour is way too contrasting D:*
snow white VS witch
*very random, but our skin colour is way too contrasting D:*
snow white VS witch

mixing Group A, B & C together

the dough should turn out this way after rubbing.
Somehow, Jess's dough seems to be a heart shape.
FULL OF LOVE GIRL :p
Fyi, Jess is baking the cranberry scones;
while me, the chocolate chips scones.
Fyi, Jess is baking the cranberry scones;
while me, the chocolate chips scones.

dough cutter to cut our dough into scones shape.
dip this cutter into plain flour, shake off the excess,
but do ensure the sides of the cutter has flour on it.
This is to prevent the cutter from sticking onto the dough when cutting.
dip this cutter into plain flour, shake off the excess,
but do ensure the sides of the cutter has flour on it.
This is to prevent the cutter from sticking onto the dough when cutting.

as the dough is kinda flat, you will not be able to fill the whole cutter with dough.
in order to fill up the whole cutter, you can take some excess dough
from the sides & "stuff" it into the cutter (the top portion).
Can refer to how Jess is doing.
in order to fill up the whole cutter, you can take some excess dough
from the sides & "stuff" it into the cutter (the top portion).
Can refer to how Jess is doing.


TA-DAH!!!
this is how it should look after cutting
It's alright if the scones have some flour by the side.
The flour is edible anyway :)

All the scones that is preparing to be egg-washed & go into the oven :>

Egg-washing my scones

All ready to be baked....
....
..
tic tock...
tic tock...

All the scones after 15-20mins!!


Mine on the left; Jess's on the right
I prefer Rocky surface.
Somehow I feel my scones taste slightly saltish :<
Jess is the better baker!
Nvm...practice makes it more perrfecctt :)
I prefer Rocky surface.
Somehow I feel my scones taste slightly saltish :<
Jess is the better baker!
Nvm...practice makes it more perrfecctt :)


Things to Note:
Group A
* NO SIEVING of plain flour is required.
* 1 teaspoon baking powder = 1/4 teaspoon baking soda
(*If you are using baking soda instead)
* Milk Powder can be replaced with Liquid skimmed/full cream/low fat milk. However if liquid milk is used, replace with water under Group C. Full cream milk powder is preferred for better taste & smell.
* Both FINE or CUSTARD SUGAR can be used.
Group B
* To use UNSALTED butter.
However if salted butter is used, remove salt under Group A
Group C
* A normal egg is approximately 55g. Thus, 40g is less than 1 egg used. But not to worry, the remaining egg can be used for egg wash during baking.
To use both EGG WHITE & YOLK.
Step 1 to 4: Do not over-rub. Just make sure the Group A, B & C is mixed well & not too cakey (no flour is seen at the end of rubbing. Group A should be well mixed by Group B & C).
Step 5: Place the dough in the chiller for MIN 10 mins to MAX 30mins.
Step 6: Make sure the dough does not shrink when cutting it. If it shrink, put it back to the chiller again.
Step 7: There are 2 types of egg-wash that will result in different surface of your scones:-
a) To obtain a "rocky" surface, dip the brush into the remaining egg (from Group C) & shake off excess before brushing onto the top of the scones.
b) To obtain a "smooth" surface, dip the brush into the remaining egg (from Group C) & brush onto the scones immediately.
a) To obtain a "rocky" surface, dip the brush into the remaining egg (from Group C) & shake off excess before brushing onto the top of the scones.
b) To obtain a "smooth" surface, dip the brush into the remaining egg (from Group C) & brush onto the scones immediately.
Step 8: Remember to pre-heat the oven first. Referring to Step 7 - Double Tray method, it actually means placing 2 trays into the oven:-
a) 1 tray with all the scones that are to be baked (which is to be placed on the upper part of the oven).
b) 1 empty tray (which is to be placed on the lower part of the oven). This is to block direct heat & prevent overheating the bottom portion of the scones.
a) 1 tray with all the scones that are to be baked (which is to be placed on the upper part of the oven).
b) 1 empty tray (which is to be placed on the lower part of the oven). This is to block direct heat & prevent overheating the bottom portion of the scones.
ENJOY BAKING!! ;)
Baking Studio / 烘焙工作坊
~~Baking Workshop for Individual, Group & Team Bonding~~
Address: Blk 333 Kreta Ayer Road
#02-32
Singapore 080333
Singapore 080333
Tel: 8383 5698
Email: bakingstudio@itsi.com.sg
No comments:
Post a Comment